Part II
Hi gang,
So in the previous part we learned about the basic plugin structure, the openapi.jar file and how to build a very simple ‘Hello world’ plugin.
Today we’re going to dive a little deeper into the OpenAPI structure. Because the OpenAPI provides us with many features, but those are useless if we don’t know how to use them. For example: the ‘Hello world’ plugin generated some output but that ended up in vp.log (the Visual Paradigm logfile). There’s nothing necessarily wrong with that, but Visual Paradigm has a message pane so why don’t we use that instead?
How? Well, for that we’ll need to take a closer look at the basic OpenAPI structure:
The OpenAPI structure
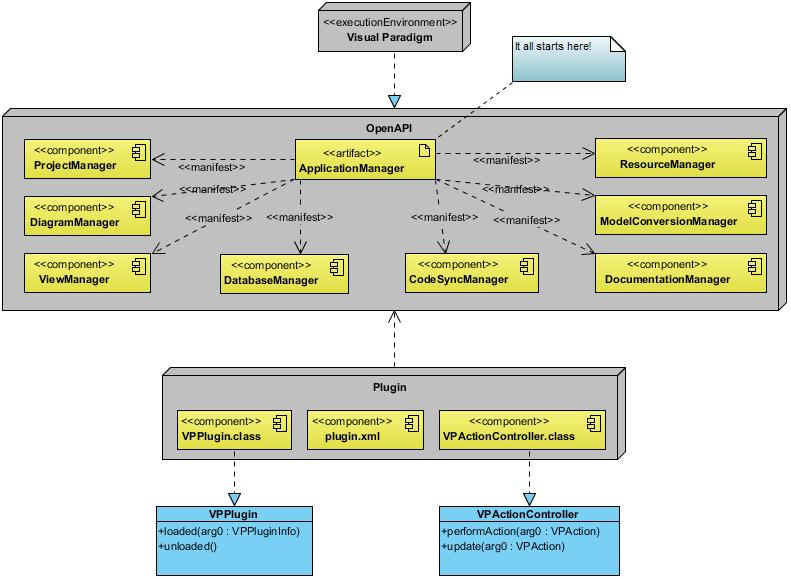
Don’t worry: it’s hardly as complex as it may seem at first glimpse.
First: The OpenAPI is realized by the Visual Paradigm program (obviously). This is seen at the top. Also: our eventual plugin depends on the OpenAPI structure to be present, that can be seen at the bottom. A regular plugin usually consists of 2 classes: the main plugin class and an “action controller” class.
So: the main important thing to know about the OpenAPI is that it fully evolves around the ApplicationManager. If you check the online API documentation yourself (see the com.vp.plugin package) you’ll soon notice that ApplicationManager is one of the very few classes. Most of the OpenAPI consists of interfaces.
This is where your plugin programming usually begins. And it should be easy enough to remember: we’re trying to control the Visual Paradigm application, as such we need to start focusing on the ApplicationManager. Makes sense, right?
As such: ApplicationManager vpam = ApplicationManager.instance();
So, the OpenAPI consists of different parts and each is controlled by a manager class. The diagram above gives you a rough overview. Here’s what those manager classes can roughly be used for:
- ProjectManager => This class provides control over the current project (*.vpp file) which you’re working on. Some specific features are to open a project, save a project or get direct access to the IProject class which in its turn provides support to link projects, iterate over all diagrams and trivial tasks such as getting the projects name or checking if it has been modified.
- DiagramManager => Should be obvious enough: normally a project consists of several diagrams, this class gives you access to those. Notable features are the ability to create a diagram, get an overview of the currently opened diagrams and to create a specific diagram element (a shape).
- ViewManager => This class controls some GUI related aspects. So it can be used to relay information to a user, either through means of the message pane or maybe by using a simple dialog. Some specific features are to add text to the message pane and opening specific dialog windows (file dialog, message dialog, etc.).
- DatabaseManager => As you probably know Visual Paradigm can generate SQL code based on your ERD diagrams. This is the class which controls all that. Notable options are generating SQL code.
- CodeSyncManager => Generating SQL code is only but a small part of what Visual Paradigm can do with diagrams, it can also generate source code based on your diagram(s) or generate diagrams based on existing source code. This class controls all of that. Notable options are updating to code or to UML.
- ResourceManager => Visual Paradigm can use external images and use those in your project. This class provides a way to access those. It can provide access to icons or input streams.
- ModelConversionManager => If you have a diagram then you can save it as an image file. This class provides those options. Specific options are to export your diagram or in specific its elements as an image or to import specific items such as XML data.
- DocumentationManager => Apart from saving one (or more) diagram(s) as an image you could also consider adding those to a report file of some sort. Visual Paradigm can be used to generate Word, PDF or HTML files based on your current work. This class controls all of that. Specific options are to generate those external files, or to show a specific dialog which allows the user to fine tune specific options.
So in my previous ‘Hello world’ example it would have been much easier if I had used the ViewManager class. Then I could have relayed my text using the message pane; so then the user wouldn’t have to mess around with a somewhat arcane logfile.
A simple build script
If you’re building one single plugin then it might make sense to copy the OpenAPI jarfile and then using that to build against. But what if the library gets updated? Or what are you doing to do if you want to program more plugins? I suppose you could use something as: javac -cp ../helloworld/openapi.jar -d build org/catslair/vp/test.java but this isn’t very elegant.
And that’s not even mentioning the upcoming need to copy the resulting build to your plugin folder so that you can test it.
Well, to make things easier on yourself you could consider making a simple Ant build script. Ant is a program build in Java and meant to help you build your own Java programs more easily. An Ant script is set up in an XML format and can be used to make Ant do all sorts of things. From compiling your code, building jarfiles right down to deploying code to an application server.
And it’s really not as hard as it might seem…
<project name="Hello Plugin" default="build">
  <description>
    ANT build script for a Visual Paradigm plugin.
  </description>

  <property name="src" location="."/>
  <property name="build" location="build"/>
  <property name="openapi" location="d:/program files/visual paradigm 15.0/lib/openapi.jar"/>
  <property name="vp" location="c:/users/peter/appdata/roaming/visualparadigm/plugins"/>

  <target name="build">
    <javac srcdir="${src}" destdir="${build}" classpath="${openapi}" includeAntRuntime="no"/>
    <copy todir="${vp}/${ant.project.name}">
      <fileset dir="${build}"/>
    </copy>
  </target>
</project>
So here I defined an Ant project called “Hello Plugin”. I also told Ant that the default build target for this project is called ‘build’, this is where the code gets compiled and processed.
Next I defined 4 properties which should speak for themselves. The main advantage in using the openapi.jar file from the Visual Paradigm program folder is to make sure that you’re always using the latest version. So if you’ve recently updated Visual Paradigm then this build script would automatically use the updated OpenAPI.
And finally the build target itself. It consists of 2 instructions. ‘javac’ makes sure that the code gets build against the openapi.jar file and that the class files will be placed in the build folder. The ‘copy’ instruction makes sure that the contents of that build folder get copied to the Visual Paradigm plugin folder. In a separate folder of course, it uses the same name as that of the Ant project.
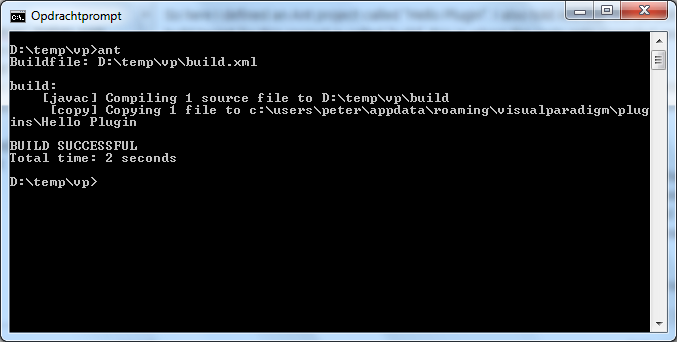
So instead of having to run javac and copy manually now all you have to do is run Ant and it will take care of the rest:
The fun part is that Ant can be used for tons of different things. For example a new target called “dist” which would archive the build folder contents to a ZIP file which can then be used to sent the plugin to someone else.
After that a mere ant dist would be enough to build the plugin and archive it.
And that concludes part 2
So now we’ve taken a look at some of the key components of the OpenAPI (the manager classes) and we have an easier way to build our plugins using Apache Ant.
In the next part we’re going to look at making our plugin work “on demand”; so that it will only do something after the user clicks on an option.