A new week, a new set of tips ![]() Now, the first tip was copied from a thread I made earlier this year. It’s not my intent to merely copy stuff, but that thread was made when Visual Paradigm was still using the previous forum, so I think it is somewhat fitting to have those 2 topics made available in this more modern version. This week I’ll address the first item, next time I’ll focus on the second.
Now, the first tip was copied from a thread I made earlier this year. It’s not my intent to merely copy stuff, but that thread was made when Visual Paradigm was still using the previous forum, so I think it is somewhat fitting to have those 2 topics made available in this more modern version. This week I’ll address the first item, next time I’ll focus on the second.
The anonymous project
Please note that this is not the official name but rather something I came up with myself because I think it is actually quite fitting.
As you probably know you can fully customize Visual Paradigm so it meets your own specific requirements. This customization can be done in many different ways. You can change the formatting of your model elements, you can specify how the fonts in the program should look, which type of connectors should be used, if a Use case should show extension points, and so on.
All of these options affect the project you’re currently working on. Most of the options I previously mentioned can be customized in the “Project options”, you can find this option on the Window toolbar. However, if you use this option then the changes you make will only reflect on the project you’re currently working on. And that can become tedious if you want to use some settings all the time. Fortunately there’s an easy solution to this.
When you start Visual Paradigm for the first time you’ll eventually see the welcome screen which allows you to create several diagram types. And if you look at the titlebar you’ll notice that you’re currently working on the “untitled” project. This is the so called ‘anonymous project’ I’m referring to. Another way to open it is to close any project you’re currently working on (use the “close” option on the Project toolbar). By closing your own project you’re also activating this ‘anonymous project’.
What makes this project special is that any project changes you make here will retain and be automatically used again the next time you start Visual Paradigm, therefor they will also be applied to any new projects you’re starting.
So:
- Start Visual Paradigm (or close your current project).
- Make any specific project changes which you always want to use (for example: diagram defaults in the “Project options”, or maybe a specific formatting for one or more model elements).
- Close the project, or quit Visual Paradigm.
Do note that this doesn’t apply to every option. For example: if you import several styles from another project then those styles won’t retain. But if you change specific options (such as the previously mentioned ‘use case extension points display’) then those will retain.
Visual Paradigm News
Did you know that Visual Paradigm has recently been certified as an official ArchiMate 3 Enterprise Architecture tool? You can read the official announcement on Twitter here, and if you’d like to know more about ArchiMate support within Visual Paradigm then please follow this link.
How I learned about this? Easy, the Visual Paradigm news of course:
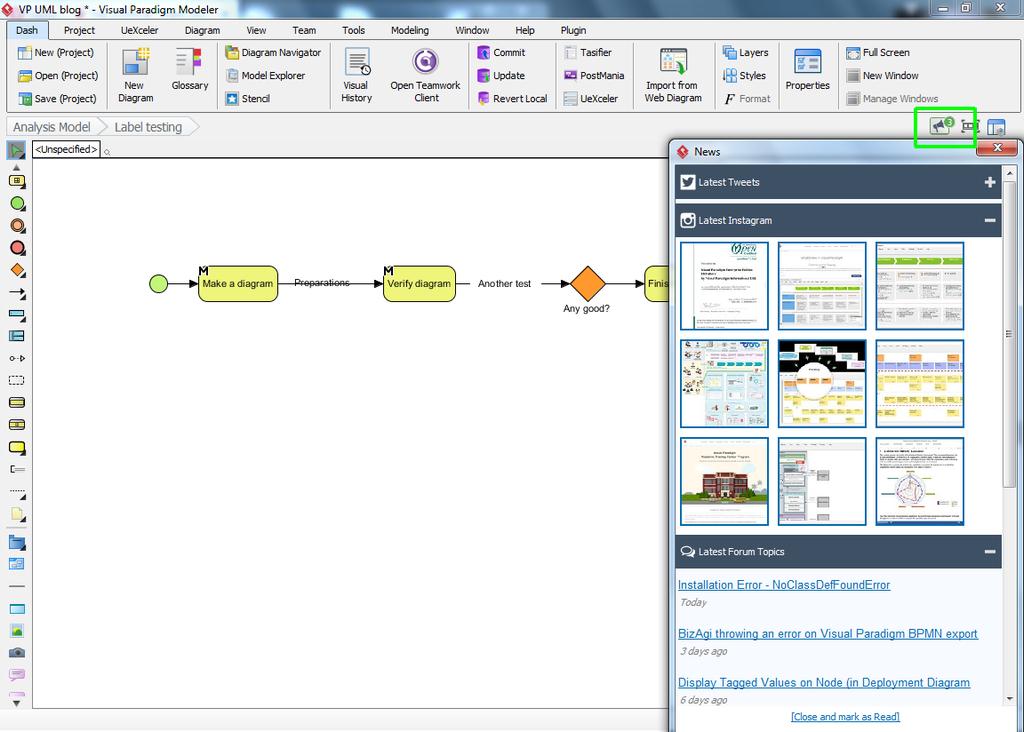
When you’re working on a diagram you’ll see the ‘News’ icon in the upper right corner, right next to the ‘switch diagram’ and ‘project browser’ options. When you click on the icon it will display a pop up screen as shown in the screenshot above. This lists news from all major Visual Paradigm news sources: Twitter, Instagram and of course this forum.
It’s one of those small features which, in my opinion, can be really useful at times.
Diagram spotlight
In my last message I started this section because I was running out of ideas a bit and I figured that it might be interesting. This time I actually planned ahead because now I’d like to highlight one of my favorite diagram types:
The Textual analysis diagram
How do you start a new project? This is something we all probably do in a different way. I know some people who prefer to start with a BPMN diagram and then work their way ‘down’, others prefer starting with a Use Case diagram after which every use case forms the starting point for another diagram which highlights more details, and so on.
And there’s the textual analysis. As its name implies this diagram basically provides you with a text editor in which you can write a new document or you can import something which already exists of course. The idea is that this diagram should be an analysis, or description, of whatever it is you’re trying to work with in your modeling project.
So, now you might wonder why am I so excited about a mere text editor. Well…
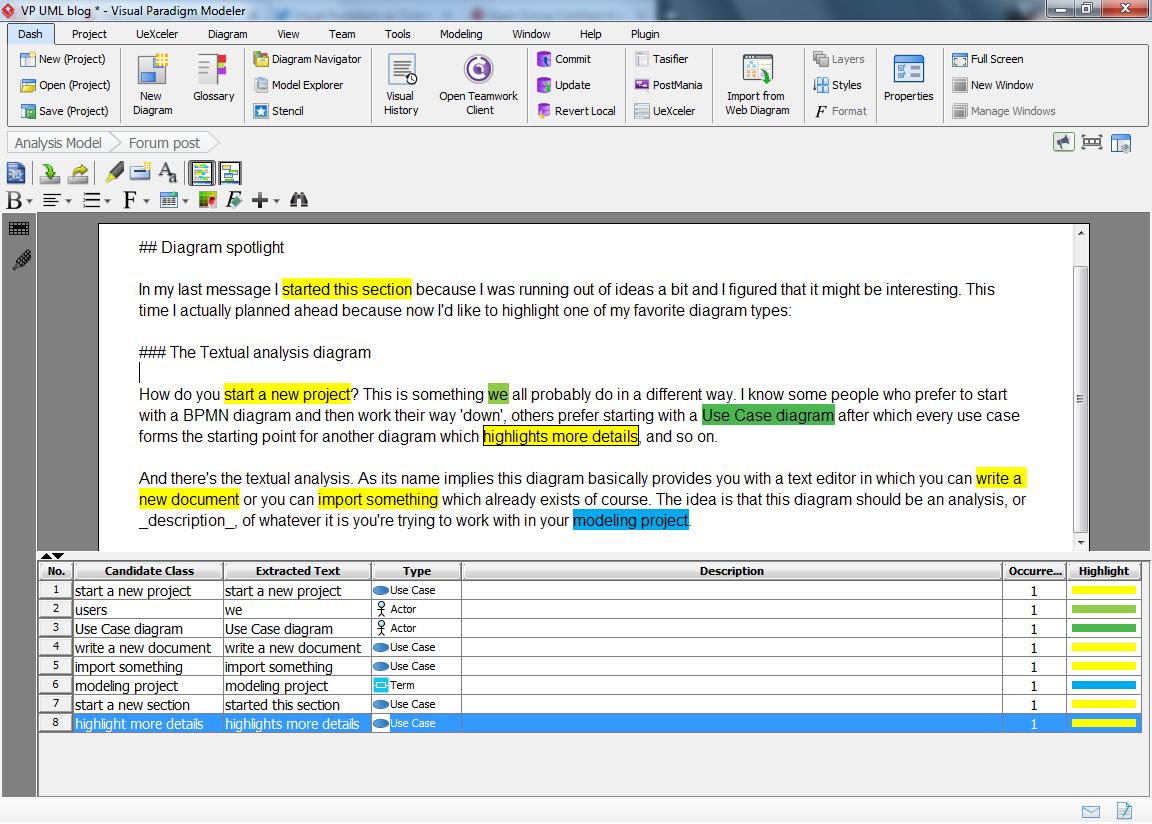
As you can see I’ve inserted the exact same text which I typed above. But notice the sections which are marked with specific colors? Also pay close attention to the section at the bottom, this is what makes the Textual Analysis diagram such a versatile tool.
I highlighted specific text sections and then added those as so called candidate classes. This basically means that Visual Paradigm allows me to ‘extract’ a snippet of text and actually change it into a model element. So what I basically did above was analyze my text, and then extract several elements which I can now directly use within a Use Case diagram. After all: I have some actors and several use cases.
And don’t worry if a text section doesn’t exactly match what you’re looking for, you can easily rename the candidate class so that the eventual model will be exactly what you need.
Using the extracted candidate classes
As the name ‘candidate class’ implies you’ve basically created elements which could be used in a specific way, but they don’t have a specific form or shape just yet. They’re candidates, but not real model elements. Not yet anyway.
There are several ways to use these model elements. First you could simply start your new diagram, pull up the ‘Model Explorer’ pane and then simply drag the candidate classes which you want to use onto your diagram:

Although this is probably the easiest way it’s not something I prefer. After all: one of the key features of Visual Paradigm is the Resource Catalog which allows us to add new elements to our diagram without having to drag them from a palette of some sorts. So why start now?
The second option, my personal favorite, is to set all of this up from within the textual analysis diagram itself. First switch to the candidate pane view by clicking the appropriate item in the top icon bar, this will display all the candidate items in a grid. It also allows you to move the elements around.
Then simply right click on one of them and select the option “Create model element”. Note: the element type will also be used. So: “create actor model element” or “create use case model element”, and so on:

Note: you don’t have to switch modes if you don’t want to. You can also easily right click on any of the text snippets shown in the list at the bottom, it’s simply that I personally prefer this way of working.
After selecting the option you’ll be taken to a new dialog which allows you to create a new diagram with the new model element, to add the new model to an existing diagram and finally you can also chose not to make the element visible just yet. In the last case it will simply be created within the model you’re working in (see the project browser and/or model explorer) and that’s it.
The easiest option is to start by creating a new diagram and automatically add the new model element. Then when you ‘convert’ the next model element tell VP to add it to an existing diagram, and select the diagram you just created. Then continue this process until all model elements have been added. Open the new diagram and re-arrange the elements as needed.
Another option, one which I often use, is not to add anything but only create the element and that’s it. Once you have enough model elements simply create the new diagram you need. So, in my example above I’ve created several actors and use cases so I’d start with a Use Case diagram. Of course this is all optional. You could also extract BPMN tasks or subprocesses, maybe even an organization chart unit. If you did that then it obviously makes more sense to create a BMPN diagram, or maybe an organization chart.
After you have the new diagram add the model element as you normally would, but when it asks you to enter a name press control-space. Now Visual Paradigm will show you a list of currently available model elements. Select the one you need and you’re all done:
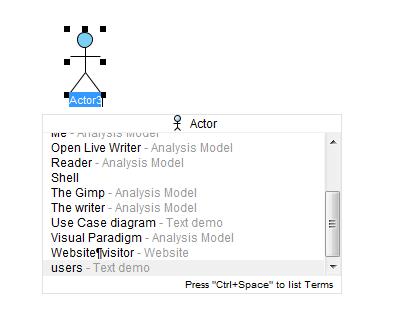
Do note though that this won’t add the original element to your diagram but it will rather create a new (auxiliary) view. If you want to add the original element you need to follow the stops I explained above.
But the reason why I prefer using this method is because of its ease of use (you’ll set up a diagram very quickly this way) and because the original element won’t be part of any diagrams which makes it easier to recognize as an ‘imported element’ later on.
Of course how you’re going to add the elements is fully up to you.
And there you have it…
Three more tips, I hope these can be useful for some of you.