Hi gang!
Well, its been a week and I did promise to share some more tips later on. It really helps that I learned a few things about this forum in the mean time, so lets jump right in!
Dash menu

I honestly just started using this myself for a week or so, and it is so easy to miss yet can save you so much time…
If you’re using Visual Paradigm’s sleek interface then you’re using a so called “Ribbon-like interface”. On the top of the screen you’ll find several tabs which open different toolbars which contain different options grouped together by their relevance.
For example: the diagram tab contains options such as copy / paste, group options, search… All sorts of options which can be used to manage your diagrams. The Project tab on the other hand contains options such as load and save project, import / export, print, and so on. All sorts of options which apply to an entire project.

Although this makes it quite easy to quickly find the option(s) you need, it also means that you may be switching back and forth between tabs quite a lot. Although Visual Paradigm provides easy to use keyboard shortcuts (see above) it could be much easier if you didn’t have to switch between tabs in the first place.
This is where the Dash menu comes into play…
How to start using it
It couldn’t be easier! Just use Visual Paradigm as you normally would but every time you find yourself using an option more than a few times try right clicking on it, and then select “Add to Dash Menu”. Continue doing this until you’re satisfied, once you’re done open the Dash menu (click on the first tab).
Now, things probably look pretty chaotic right now so start by right clicking on the dash menu and then select the option “Configure Dash menu…”. This will open up the following window:
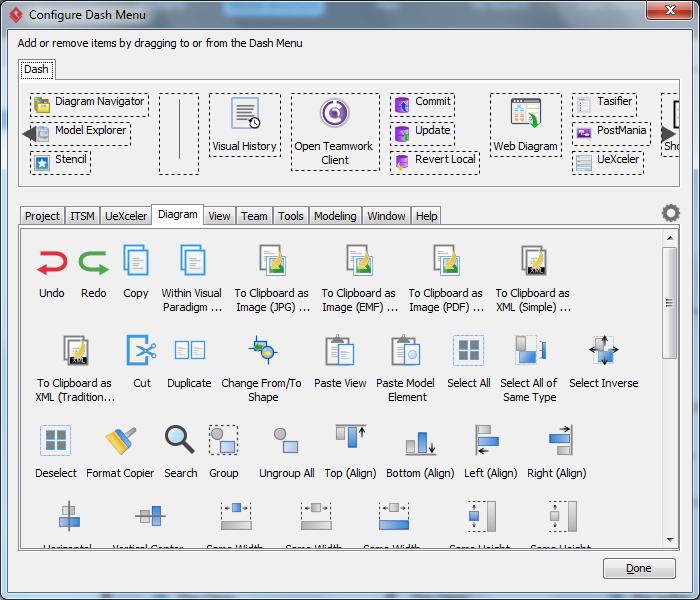
You can drag items left and right across the menu to reposition them, you can place items next to each other which makes VP use a regular icon, but you can also group items so that you create a stack; you can place a maximum of 3 options above each other which can save up a lot of space.
Finally also take note of the separator item; this allows you to add a small space between icons which can help you group those together. Despite what I showed above you don’t need to use separators if you stacked some options.
As I mentioned before I only started using this quite recently, but despite that I still noticed that I’ve been switching between tabs a lot less often. Instead I simply click the option(s) which I need and then I can continue to focus on my work again.
Working with multiple diagrams => Subs & Refs
When you’re working on a more complex project then you may find yourself using several diagrams which each visualize a different aspect of your work. Some diagrams even provide native support for referencing other diagrams, this is particularly true for the UML Activity and the BPMN diagrams.
And as one could expect Visual Paradigm itself can also help you with this. However, as usual this isn’t a “One size fits all” kind of feature and you might want to take note of both ways to do this in order to decide which option meets your requirements the best.
Sub diagrams
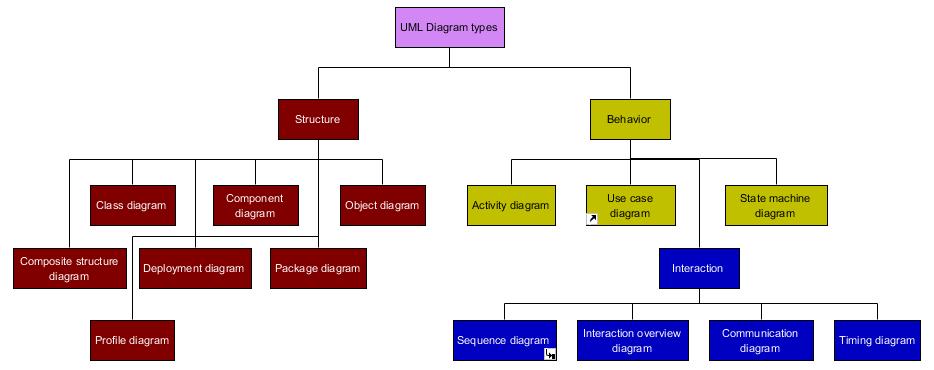
Here I have diagram which shows an overview of all the different UML diagrams. If you take a closer look at the sequence diagram entry you’ll notice that it has a small icon in the lower right corner. This indicates that this model element has a so called sub diagram assigned to it. Clicking on the icon will show a menu which lists all the linked diagrams and will also allow you to add even more sub-diagrams.
This option can be extremely useful if you have a model element which roughly describes a part of your workflow which you also want to describe in more detail. Instead of cluttering up your current diagram you simply assign a new diagram to the model element which you can then use to showcase all the missing details.
So far, so good. However, there’s something you need to be aware of…
If you’re using a specific project model structure then any used sub diagrams will also have their affect on this. Lets look at the model structure for the UML overview diagram which I displayed above:

The diagram itself is listed under the “Website” model, and I’ve selected the “Sequence diagram” model element. But if you look closely you’ll notice that the “Sequence example” diagram is shown here as well.
That’s because “Sequence example” is a (sub) diagram which is ‘linked’ to the “Sequence diagram” model element. In this case that is exactly what I intended; this helps me to not only keep track of all my website related work, but it also shows me the underlying relation between the different parts. In this particular example the relationship between the “Sequence diagram” model element and the “Sequence example” (sub)diagram.
Unfortunately this can also create a problem.
What would happen if I needed to refer to a diagram which was part of another model? For example: let’s say that I have another sequence diagram in my “Examples” model and I want to refer to that as well. Well… the very moment when I select that other diagram to be a sub-diagram then it will be automatically moved to the “Website” model in order to reflect on the new relationship, just as you’ve seen above.
But now this creates a problem for me because I need the diagram to remain a part of the “Examples” model. That model should contain all of the examples in my project.
Fortunately there’s a solution…
References
Instead of adding a sub diagram you can also add a reference. If you scroll back to the UML overview diagram shown above and look at the “Use case diagram” model element you’ll notice that it has a small icon in the lower left corner. That icon shows that the model element contains a so called reference.
A reference is just what its name implies: a pointer to something else, where ‘something’ can be just about anything: another diagram (in the same or another VP project), a file, an URL, a folder, or even another model element or a shape can be referenced.
This allows you to still have direct access to another diagram yet without having to move that to a model in which it might be out of place.
Adding a sub-diagram or reference
Just in case that it wasn’t clear enough: you can add a sub-diagram or reference in the same way as you follow up on one. Just click on the model element and the icons will automatically show. Click on the icon you need and then select the “Add sub-diagram” or “Add reference” option respectfully.
Locking your diagram
And finally…
Has this ever happened to you? You finished a diagram after a few hours and made sure that all your model elements are perfectly aligned to each other. Now you’re using this diagram as an easy reference.
While working on your project someone asks you something about it and you quickly open the diagram but unfortunately move one of your elements by accident. Because you’re busy talking about the project you forget all about this accidental move.
… only to get reminded about it after you closed and saved your project. “Oops” ![]()
Fortunately there’s a solution to prevent this from happening: Locking your diagram:
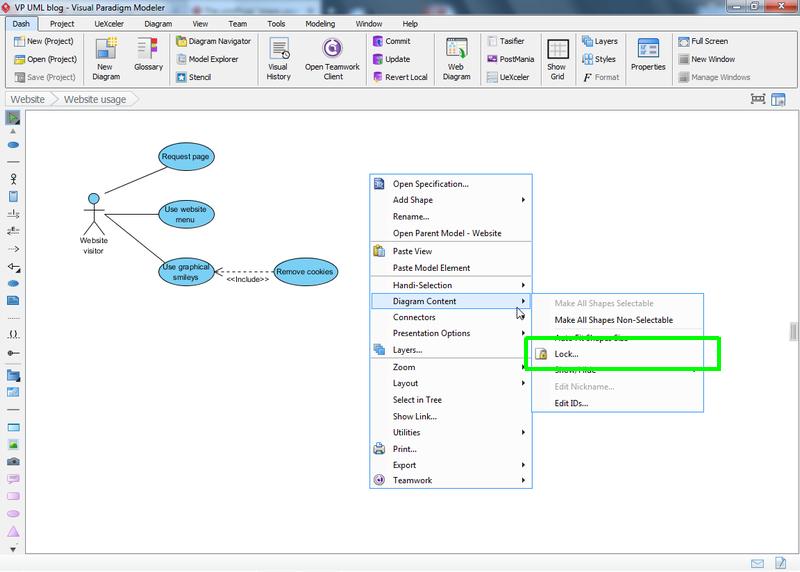
It couldn’t be easier: just right click somewhere in your diagram and find the option shown above. Once clicked you have several ways to protect your work from tampering. First you can add a simple lock, this will trigger a warning whenever someone (or you) tries to change the current diagram. A simple hit on the escape key will be enough to dismiss the warning and undo any accidental changes.
Next you can also add a password; this will seriously help you protect your work because no one will be able to make any changes without your authorization.
Better yet: if you’re working in a team you can also chose to assign specific team members. This will allow the members to work on the diagram while everyone else will be prompted about the current lock, optionally with the requirement to enter a password in order to unlock it.
Small changes?
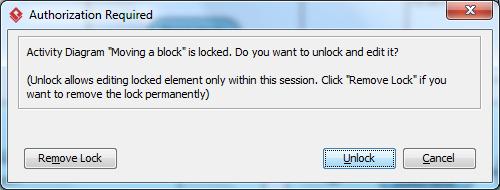
So what if you have any quick changes you need to make? Well, fortunately you don’t have to remove and re-apply the whole lock again. Just click “Unlock” in the pop up window (as shown above) and that will grant you temporary access. So during your current session you can apply changes to the diagram, and once closed it will be locked again.
And there you have it…
Three more tips which can hopefully help you get even more out of Visual Paradigm.