Hi gang!
Editorial
It’s been a while since I’ve been here, I missed this community!
The nice thing about getting a new PC and then installing all your software again is that it gives you a good fresh look at your current setup which may even help you to improve on some things.
And sometimes things turn out to be a bit of a disappointment ![]()
I’ve been using the NetBeans Java IDE for as long as I’ve been using Visual Paradigm. Fun fact: It’s because of NetBeans that I discovered Visual Paradigm in the first place! So when I was setting up my new PC I obviously wanted to get the latest NetBeans version as well. Well… I got a decent high end machine. My PC can run games such as GTA 5 with the graphical settings set to ultra and high.
… yet an IDE such as NetBeans takes around 2 -3 minutes to start ![]() . I didn’t fully time it but I did compare it to two other programs developed in Java: Minecraft and Visual Paradigm, and both of which start way faster than NetBeans! I also wasn’t very pleased to see NetBeans lose support for Java EE for well over a year now, even though deployment can be as simple as running the right Ant task.
. I didn’t fully time it but I did compare it to two other programs developed in Java: Minecraft and Visual Paradigm, and both of which start way faster than NetBeans! I also wasn’t very pleased to see NetBeans lose support for Java EE for well over a year now, even though deployment can be as simple as running the right Ant task.
And so I decided to replace NetBeans with something else. Not an easy decision given my history with it, but… the current NetBeans 10 is hardly the cool and efficient IDE anymore which I came to love and respect.
So I started to look around for a lightweight but still feature rich editor which I could use for Java coding. And I was quite surprised with the end results ![]()
Sorry for a small vent, I wanted to provide a bit of context ![]()
What is VS Code?
It’s ironic that my new tool of choice for Java programming comes from a company which once tried very hard to compete with Java, but this is what happened ![]() VS Code is short for Visual Studio Code and it’s an open source editor which is fully aimed at coding. It provides you with all the options you would expect from an editor (IntelliSense, code completion, templates, markup and code formatting) but it also provides extensive support for plugins (“extensions”).
VS Code is short for Visual Studio Code and it’s an open source editor which is fully aimed at coding. It provides you with all the options you would expect from an editor (IntelliSense, code completion, templates, markup and code formatting) but it also provides extensive support for plugins (“extensions”).

In fact… some of those very same extensions provided support for the features I wanted: Java and Ant support. I also added PowerShell scripting support but that’s beyond the scope of this guide (I’m a huge PowerShell fan).
Now, I don’t have much experience with this platform as of yet, but I am enthusiastic enough about it that I really wanted to share this with the Visual Paradigm community. Especially because VS Code can be used on Windows, MacOS and Linux, just like Visual Paradigm itself!
Getting started
When you start VS Code you’ll get a screen which is comparable to what I’ve shown above. VS Code itself doesn’t support Java, we’ll need to add this by installing a few extensions:
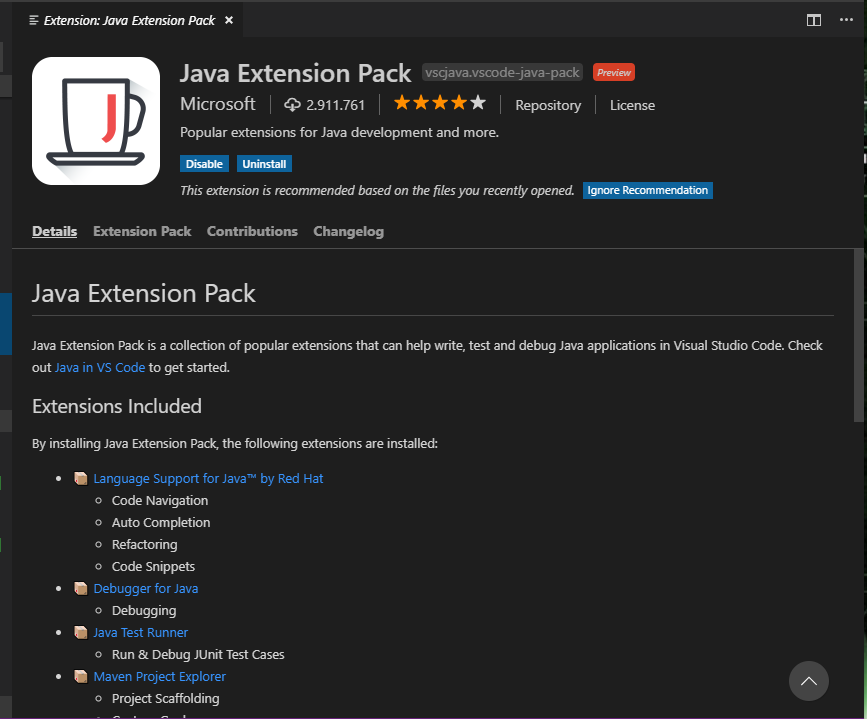
Start by getting yourself the Java Extension pack made available by RedHat. This will pull in several other plugins which we’re going to need for our plugin project. Next also be sure to install XML, also by RedHat. This plugin provides full support for XML files (code completion, indenting, etc.).
If you’re familiar with Maven and have no problems with using it then you could stop here, but I personally favor Ant as my build tool. So to follow along with this tutorial you’re also going to need the Ant target runner and I recommend getting the Ant tree viewer as well.
Now we’re ready ![]()
Setting up the first project
Before we begin I have to stress this out: VS Code, despite its extensive features, is a code editor first and foremost. It is not an IDE even if it may look like one. So keep this well in mind, because we’ll need to do several things which you’d expect to happen automatically if you were using an IDE.
There are many commands and options in VS Code for which there isn’t any fancy menu item and as you can see it also doesn’t provide icon toolbars (thankfully ![]() ). So to get started we’ll need to press Control-Shift-P which will show the command palette. Now type java and you should see the option to create a new Java project:
). So to get started we’ll need to press Control-Shift-P which will show the command palette. Now type java and you should see the option to create a new Java project:

Now, VS Code uses 2 different locations. First is the so called workspace location, this is a folder which contains all files which configure your environment. The second is the actual project location, this is usually a sub folder of your workspace and contains your project files.
In my example I’m using documents\develop\VSCode as the workspace location and HelloWorldPlugin as the project name (and its location).
Once we entered these two names then the extension will create an example Java application, build it and… that’s it ![]()
Configuring the classpath
Next we’ll have to tell VS Code about Visual Paradigms OpenAPI. We do this by editing the .classpath file which you can see in the root folder of your project. You can find the OpenAPI jar file in the lib folder of the Visual Paradigm program folder. Open a file manager, locate the file and then copy the path to your clipboard, then edit .classpath:

This is one of those tasks which you’d normally expect the IDE to set up for you, or which you would set up yourself using a nice graphical option. VS Code can use several Java project types where the standard is Maven. In this example we’re using the default project type which is build upon Eclipse. The full line which I added is:
<classpathentry kind="lib" path="C:\Program Files\Visual Paradigm 15.2\lib\openapi.jar"/>But there’s more configuring to do: right now we provided the editor with knowledge of the OpenAPI jarfile, it’ll use this to provide us code completion and to check our code for errors.
However, we’re not going to use the default building system. Instead I want to use Ant. Therefor the next task is to add an Ant build configuration called build.xml. Press Control-N to add a new file, then press Control-S to save it, name it build.xml and add the following XML code:
<project name="Hello plugin" default="build">
    <description>
        ANT build script for VP Plugin
    </description>

    <property name="src" location="src"/>
    <property name="build" location="bin"/>
    <property name="openapi" location="c:/Program Files/Visual Paradigm 15.2/lib/openapi.jar"/>
    <property name="vp" location="C:/Users/lionp/AppData/Roaming/VisualParadigm/plugins" />

    <target name="build">
        <javac srcdir="${src}" destdir="${build}" classpath="${openapi}" includeAntRuntime="no"/>
        <copy todir="${vp}/${ant.project.name}">
            <fileset dir="${build}"/>
        </copy>
    </target>
</project>
This will set up an Ant build target which will build our plugin located in src and then places the end result in the bin directory. Of course we also made sure to tell Ant about openapi.jar so that it can be used to build against.
Now, this may seem like a lot of effort in comparison to an IDE where you’d basically create a new project, right click on your library collection and then add the openapi jarfile. And you’d be right. But keep in mind that VS Code is perfectly capable of using templates for code snippets and files, and a good example of that can be seen above with the example project.
So normally you’d only do this once and add all these steps into an action (or template) of some sort. The reason I’m not going to address this right now should be obvious: I’m still learning all of this myself! ![]()
Coding the plugin
First remove the default code and then add plugin.xml to the src folder using the same method as above. This is what you should add:
<plugin
    id="HelloWorld"
    description="Your classic Hello World program"
    provider="ShelLuser"
    class="org.catslair.vp.hello" />
plugin.xml is the heart of a plugin, it tells Visual Paradigm what the plugin is all about and which Java class to use to load and start it.
As you can see I defined the org.catslair.vp package, so we need to create that directory structure and add the file hello.java. Right click on the src folder and select the ‘New Folder’ option. Enter org\catslair\vp and it should appear in a short moment.
So once again: press Control-N to add a new file, then Control-S to save it and then name this hello.java, and be sure to place it in the right folder!
Then add the following code:
package org.catslair.vp;

import com.vp.plugin.VPPlugin;
import com.vp.plugin.VPPluginInfo;

public class hello implements VPPlugin {

    @Override
    public void loaded(VPPluginInfo arg0) {
        System.out.println("Hello plugin world!");
    }

    @Override
    public void unloaded() {
    }
}
While you guys have the luxury of copy and paste I highly recommend trying to type this out for yourself, especially if you’re following along with the idea to try VS Code for yourself.
When I started coding I was honestly very surprised to see the speed in which VS Code provided me with all the information it got from the OpenAPI, it really does its best to make your life easy.
But… At the very least start by defining the class yourself (manually). You’ll immediately notice an error (a red line below the hello classname) and if you hover your mouse over it it’ll mention the lacking methods which need to be implemented.
Place the cursor inside the class and press control-space. You’ll immediately see mention of both loaded() and unloaded(). Select the name, press enter, and the method got added to your code. And much faster than NetBeans would do this too!
Building and deploying
Remember that Ant builder plugin I mentioned earlier? Now’s the time to use it ![]()
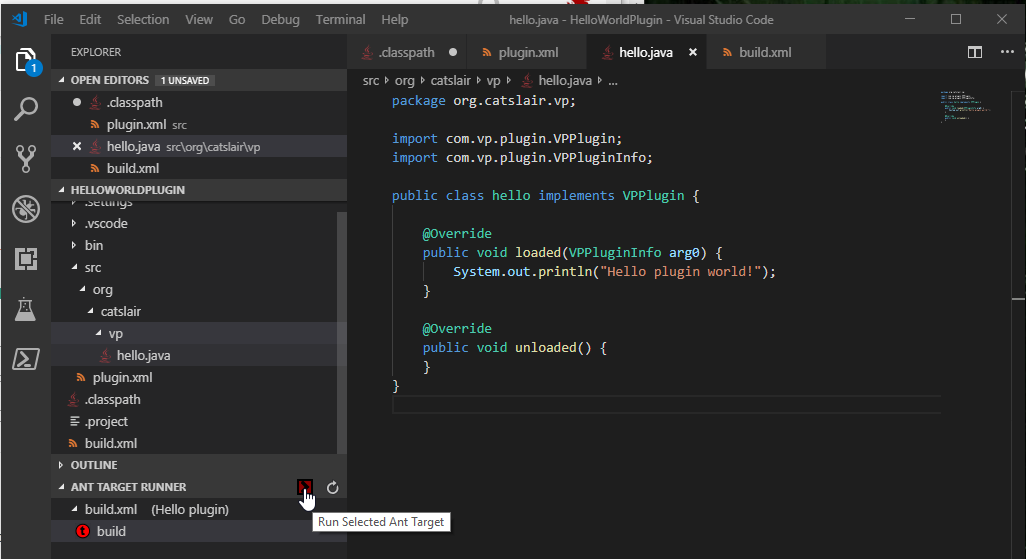
This will build our code and copy the source files to the bin directory after which Ant will copy the entire bin directory to the Visual Paradigm plugin directory.
So fire up our favorite Modelling tool and… don’t notice anything happening at all? ![]()
Don’t worry, it really worked but since we only told our plugin to write something to the console that’s what happened. And Visual Paradigm saves those messages in its logfile vp.log:
[2019/02/13 10:45:07] [message] getLicenseKey in local ...
[2019/02/13 10:45:07] [message] finish startup getLicenseKey
[2019/02/13 10:45:07] [message] Workspace: C:\Users\lionp\AppData\Roaming\VisualParadigm
[2019/02/13 10:45:08] [message] Opening Project: C:\Users\lionp\AppData\Roaming\VisualParadigm\.vpprefdata\.systemproject.vpp
[2019/02/13 10:45:16] [message] Hello plugin world!
[2019/02/13 10:45:16] [message] Suite loaded!
See? It fully worked! ![]()
If you’re having problems locating your logfile then you can also open the help tab where you’ll find the “Export Log File…” option in the lower right corner. This will produce a zip archive, so just double click on the file to open it and you’ll find vp.log (with several other files) inside.
Easier is to navigate to “%appdata%\VisualParadigm” where you’ll find your system directory which contains vp.log (and your plugins folder, go check out your new cool plugin! ![]() ).
).
And there you have it!
Honestly I feel like I’m turning into a “Microsoftie” by replacing NetBeans with Visual Studio Code but then again… this really works quite well and Code is extremely faster than NetBeans has even been for me.
And that’s not even mentioning the required storage space! My VS Code installation folder is only 193Mb big and my .vscode data folder (which also contains the extensions) is 450Mb, so 643Mb in total. Which is way smaller than a default NetBeans installation ![]()
Thanks for reading, expect more plugin tutorials in the nearby future.
(edit) PS
If you’re interested to learn more about Visual Studio code then please visit this website to learn more:
… and if you want to study the code (or build VS Code from source yourself) then you can find it’s GitHub repository here: