Another week, another set of tips! ![]()
One of the things which keeps fascinating me about Visual Paradigm (and which feeds my enthusiasm for the program) are the dozens of ways in which you can use this. As I mentioned in another post there really isn’t one ‘good’ way to do things because that’s not how Visual Paradigm works. It doesn’t try to dictate how you should make your diagrams, instead it provides you with all the tools and it’s up to you to use them.
Why I say all this? You’ll see soon enough.
Controlling your connectors
Making a diagram basically consists of placing your model elements and then connecting them using connectors, but I know that this simplifying things quite drastically. The fun part is that the way you do this is totally up to you.
You can simply drag in all the individual elements from your toolbar palette (shown at the left side of the screen) or you can make use of the resource catalog. And when doing the latter you should keep the shift key in mind.
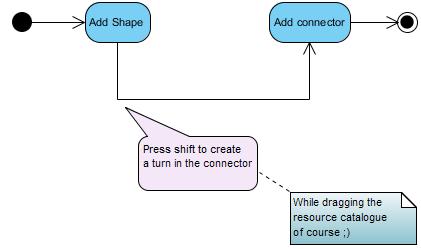
If you drag the resource catalog around (which automatically creates a connector) you can press shift once which will create a turning point. Then continue dragging and you can bend the connector while in the process of drawing it. This can really help if you want to use a specific layout but don’t want to bother with dragging everything in place afterwards. So, here’s how I made the connection above:
- First I added the two elements: ‘Add Shape’ and ‘Add connector’.
- I dragged the resource catalog down from the ‘Add Shape’ model.
- I pressed shift once (while continue dragging the resource catalog) and then dragged it to the right.
- When the indicators showed me that I was right beneath the middle of the ‘Add connector’ model I pressed shift again and then dragged the resource catalog up.
- Finally I released the resource catalog on top of the ‘Add connector’ element.
Of course this is only one way of doing it, you can apply this trick any time when you drag the resource catalog around. So also when you’re using the resource catalog to connect a new shape.
And in case you’re not fully familiar with the resource catalog:
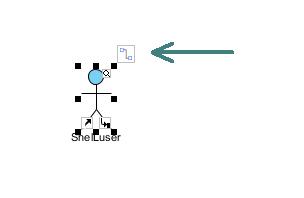
It will appear on the top right corner of any model element you select. Here you see an actor model (hey, that’s me! ![]() ) and the arrow shows you the resource catalog. So in case you’re still dragging your elements from the palette: try dragging that icon to a location where you want to create a new use case, then let go and select the use case (and connector type) you want to use. It might change the way you work on diagrams completely!
) and the arrow shows you the resource catalog. So in case you’re still dragging your elements from the palette: try dragging that icon to a location where you want to create a new use case, then let go and select the use case (and connector type) you want to use. It might change the way you work on diagrams completely!
Same width (and height and both!)
When you’re working on a diagram one of the most important aspects is the way it looks. Us humans are crazy like that: if there’s a small subtle difference in size between some model elements then you can bet that some will notice and from there on may very well become more interested in the question “are those two elements equal in size, or am I just seeing things?” rather than following your presentation.
That’s not good! ![]()
Fortunately Visual Paradigm helps us solve this problem by adding dozens of visual aids. The very moment you start dragging a model element you’ll notice several aids appear which tell you exactly how your element is aligned in direct comparison to others.
And there’s even a nice trick to quickly apply the same size to several elements at once:

Watch out because there’s more than meets the eye here.
1 - Quickly applying the same width
In the screenshot above I’m using this function for the first time, notice how the icon is the same as the ‘Same Width’ menu option? That’s because that is the default behavior, and it can really help you to quickly apply some consistency:
- First select the element(s) you want to change, you can press control to select multiple elements.
- Select the element which should define the new size last.
- Once you have selected the last element simply click on the “Same width” icon (it will appear automatically) and all your elements will now change to the same size as the last selected element.
This is how Visual Paradigm normally works: it provides you with some very useful default values which you can either use as-is or you can customize it.
2 - Customize your changes
All these “formatting options” have a small arrow besides them, and if you click on that you’ll open the menu as shown above. This allows you to customize your changes. For example I could chose to change everything equal to the smallest model element, or I can even opt to change both height and width at the same time.
Note though that once you select a menu option here then this will also change the ‘formatting icon’. So although you’re fully free to do what you like it might be a good idea to apply this kind of customizing once you finished your diagram. Of course this is totally up to you.
3 - There’s more where that came from!
This section is only showing you the options to change the size of the elements but if you look closer you’ll see two more ‘formatting options’. There’s also an option which allows you to align your elements (so they get quickly placed in alignment with each other) and to distribute them. So if you need quick formatting then Visual Paradigm has you covered.
Styles and formatting
When it comes to the official specification for some well known modeling languages such as UML or BPMN you’ll soon notice that these specifications only describe the element shapes, but not so much their formatting.
Meaning: you’re fully free to apply color and formatting to your diagrams in any way you deem fit. Of course care should be taken here, because if you create some kind of “rainbow diagram” then you can rest assured that it will seriously distract your audience.
As could be expected Visual Paradigm fully supports this by allowing you to change the formatting of an element. But there’s more…
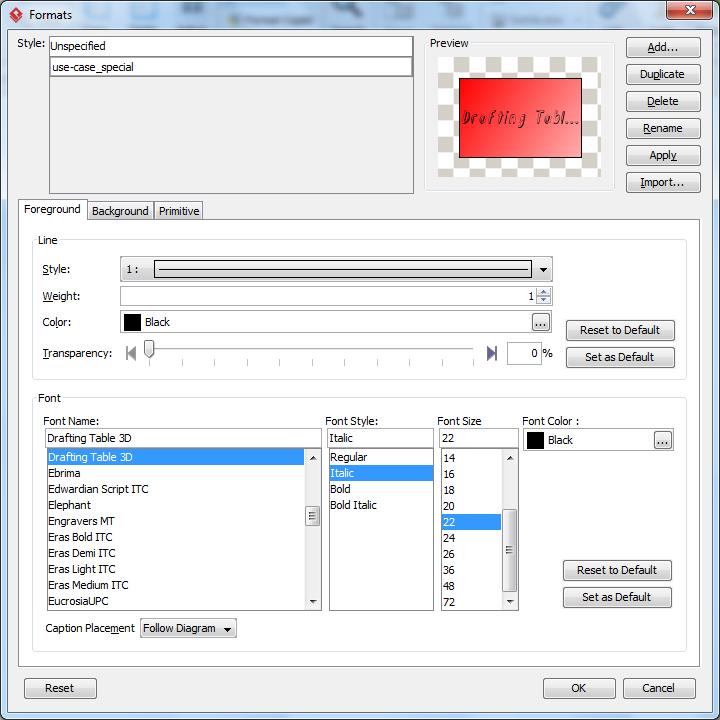
When you have an element selected select the ‘Format’ option on the diagram tab and you’ll open the screen shown above. Here I changed the formatting of one of my elements by applying a red/pink gradient background. I also changed the font to match this new style. Now, I could simply leave it at this and then either copy the element or its formatting when I need to use this on something else but that’s not very useful.
So instead I saved it as a new style, as you can see in the screenshot above. When you have your changes applied you should see the ‘Unspecified’ style being selected at the top. Press “Save as” (here shown as ‘Duplicate’, the button changes depending on your selection), type a name and you have defined a new style.
This is the ideal way to make your element formatting re-usable.
Applying existing styles
When you want to re-use a style then simply click on the ‘Styles’ option (which can be found on the ‘View’ tab) while you have the element selected on which you want to apply the formatting. Then select the style you want and click ‘Apply’:
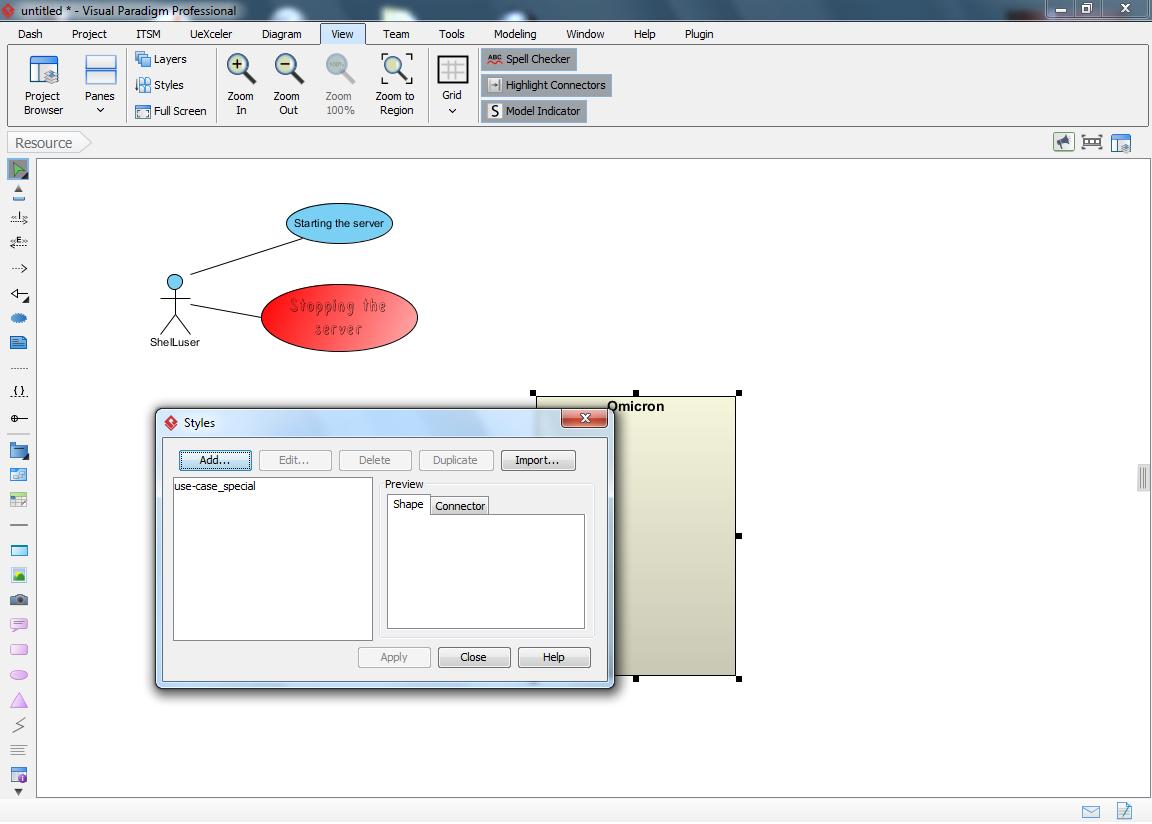
Here I have my “Omicron” system element selected and clicked ‘Styles’. So all I have to do here is to click the style, then click apply and I’m all done.
Re-using styles in other projects
But there’s much more to styles than that. And the best part: this feature is usable in all versions of Visual Paradigm. If you’re working on a project and you’d like to use styles from another project then you can also import them:

All you have to do is to click on the ‘Import’ option in the Styles window, then select the project which style(s) you want to import and finally select the style(s) you want (as shown above). In the screenshot I’m going to import the specific style which I use for my note elements.
And there you have it!
After all those more in-depth examples I figured I’d focus on something a bit easier, though I am convinced that there will be enough of you out there who might have totally overlooked these options until now (or at least I hope so ![]() ).
).
Hope this was useful for some of you!